
Exploring Android Studio OM: A Comprehensive Guide for Developers
Are you a developer looking to delve into the world of Android Studio OM? If so, you’ve come to the right place. In this article, we will take you on a journey through the various aspects of Android Studio OM, providing you with a detailed and multi-dimensional introduction. Whether you are a beginner or an experienced developer, this guide will help you understand the ins and outs of Android Studio OM.
What is Android Studio OM?

Android Studio OM, also known as the OpenJDK-based Android Studio, is an integrated development environment (IDE) designed specifically for Android app development. It provides a comprehensive set of tools and features that make it easier for developers to create, debug, and optimize their Android applications.
Key Features of Android Studio OM

Let’s take a closer look at some of the key features that make Android Studio OM a preferred choice among developers:
| Feature | Description |
|---|---|
| Code Editor | A powerful code editor with syntax highlighting, code completion, and refactoring tools. |
| Layout Editor | A visual editor that allows you to design your app’s user interface (UI) using drag-and-drop components. |
| Debugging Tools | Advanced debugging tools that help you identify and fix issues in your code. |
| Performance Profiler | A tool that helps you analyze and optimize the performance of your app. |
| Build System | A robust build system that supports various build configurations and dependencies. |
These features, among others, make Android Studio OM a versatile and efficient tool for Android app development.
Setting Up Android Studio OM
Before you can start using Android Studio OM, you need to set it up on your computer. Here’s a step-by-step guide to help you get started:
- Download the latest version of Android Studio from the official website.
- Run the installer and follow the on-screen instructions.
- Once the installation is complete, launch Android Studio.
- During the setup process, you will be prompted to download the necessary SDKs and tools. Make sure to select the ones that are relevant to your project.
- After the setup is complete, you can start creating new projects or opening existing ones.
It’s important to note that Android Studio OM requires a Java Development Kit (JDK) to run. Make sure you have the latest version of JDK installed on your system.
Creating a New Project
Once you have Android Studio OM set up, you can start creating new projects. Here’s how to do it:
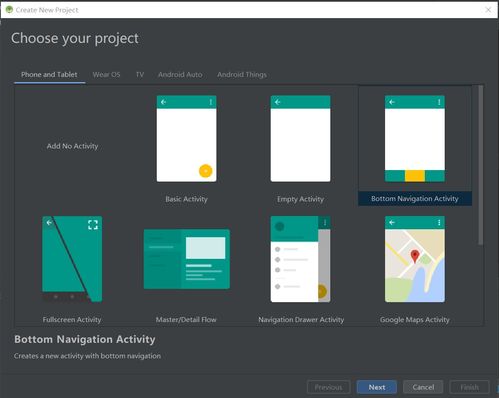
- Open Android Studio and click on “Start a new Android Studio project” in the welcome screen.
- Select the template that best suits your project requirements.
- Enter the project name, location, and other details.
- Select the desired SDK version and language (Java or Kotlin).
- Choose the minimum API level for your app.
- Click “Finish” to create the project.
After the project is created, you will see a file structure that includes source files, resources, and other necessary components.
Designing Your App’s UI
One of the most important aspects of Android app development is designing a user-friendly and visually appealing user interface (UI). Android Studio OM provides a powerful layout editor that allows you to create your app’s UI using a variety of components and layouts.
Here’s a brief overview of the layout editor:
- Open the layout XML file for your activity.
- Use the palette to add UI components such as buttons, text views, and images.
- Arrange the components on the canvas using drag-and-drop.
- Configure the properties of each component to customize its appearance and behavior.
Additionally, Android Studio OM provides a preview


